Writing Our First Command
Honestly, the Dressed documentation explains it the best!
So we’ll setup a basic /ping command as with every other basic Discord bot. The file name is important because it will be the name of the command.
export default async function(interaction) { return interaction.reply("Pong!")}If you want typing, you should type the interaction as CommandInteraction:
import type { CommandInteraction } from "dressed";
export default async function(interaction) {export default async function(interaction: CommandInteraction) { return interaction.reply("Pong!")}STOP! Before you try to register the commands you should setup the configuration. You could absolutely leave it like this, but by default it will register it as a global command and we don’t want that. We want it to be a guild command for our case. We also want to set some defaults for the command.
To do this we need to setup the the config const in the bot command:
import type { CommandInteraction } from "dressed"import type { CommandConfig, CommandInteraction } from "dressed"
export const config = { description: "Ping pong", integration_type: "Guild", contexts: ["Guild"], guilds: ["YOUR_GUILD_ID"]} satisfies CommandConfig
export default async function(interaction: CommandInteraction) { return interaction.reply("Pong!")}This config will make the command only available in the guild with the ID YOUR_GUILD_ID. It will also set the description of the command to “Ping pong”. The integration_type is set to Guild which means that the command will be a guild command. The contexts is set to ["Guild"] which means that the command will only be available in guilds. This is all just to ensure it’s only available in the guild you want it to be available in.
Registering the Command
Before we get started registering the command you should probably you know, create an application/bot!
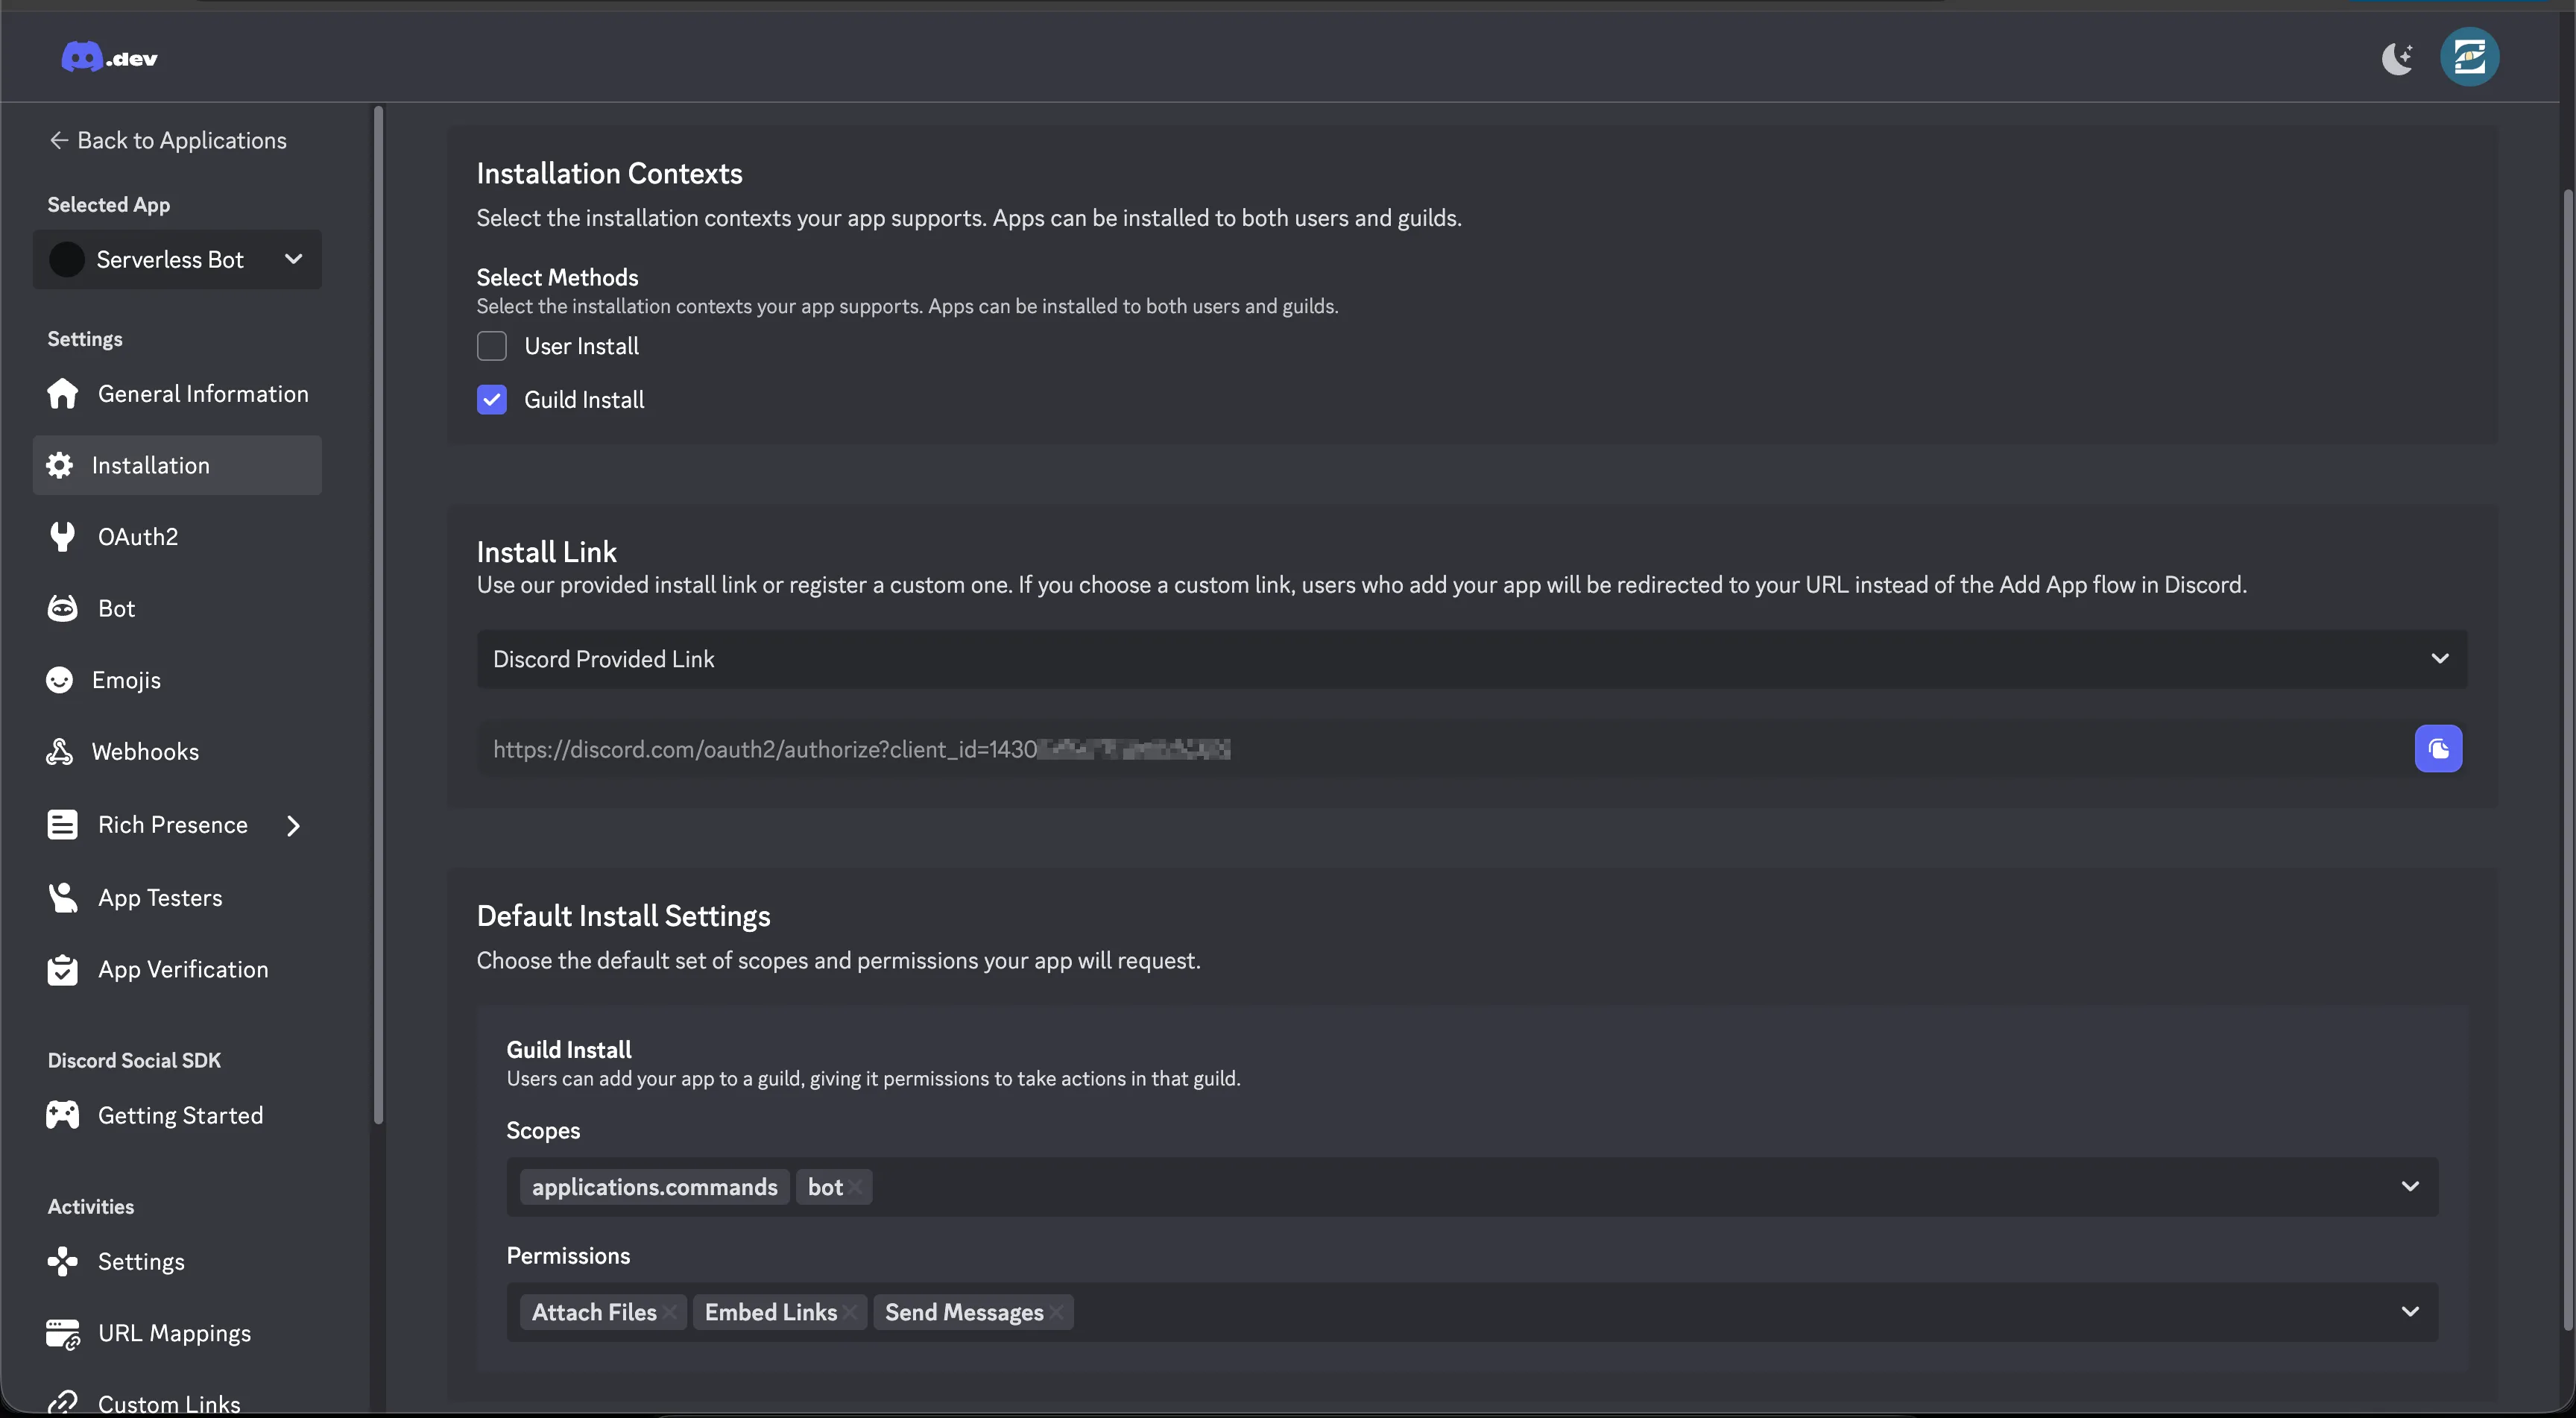
Once you have the application created, you’ll want to setup a couple things:
- Installation settings
- Default permissions
- and reset the bot token
Here’s how I set up this example bot:
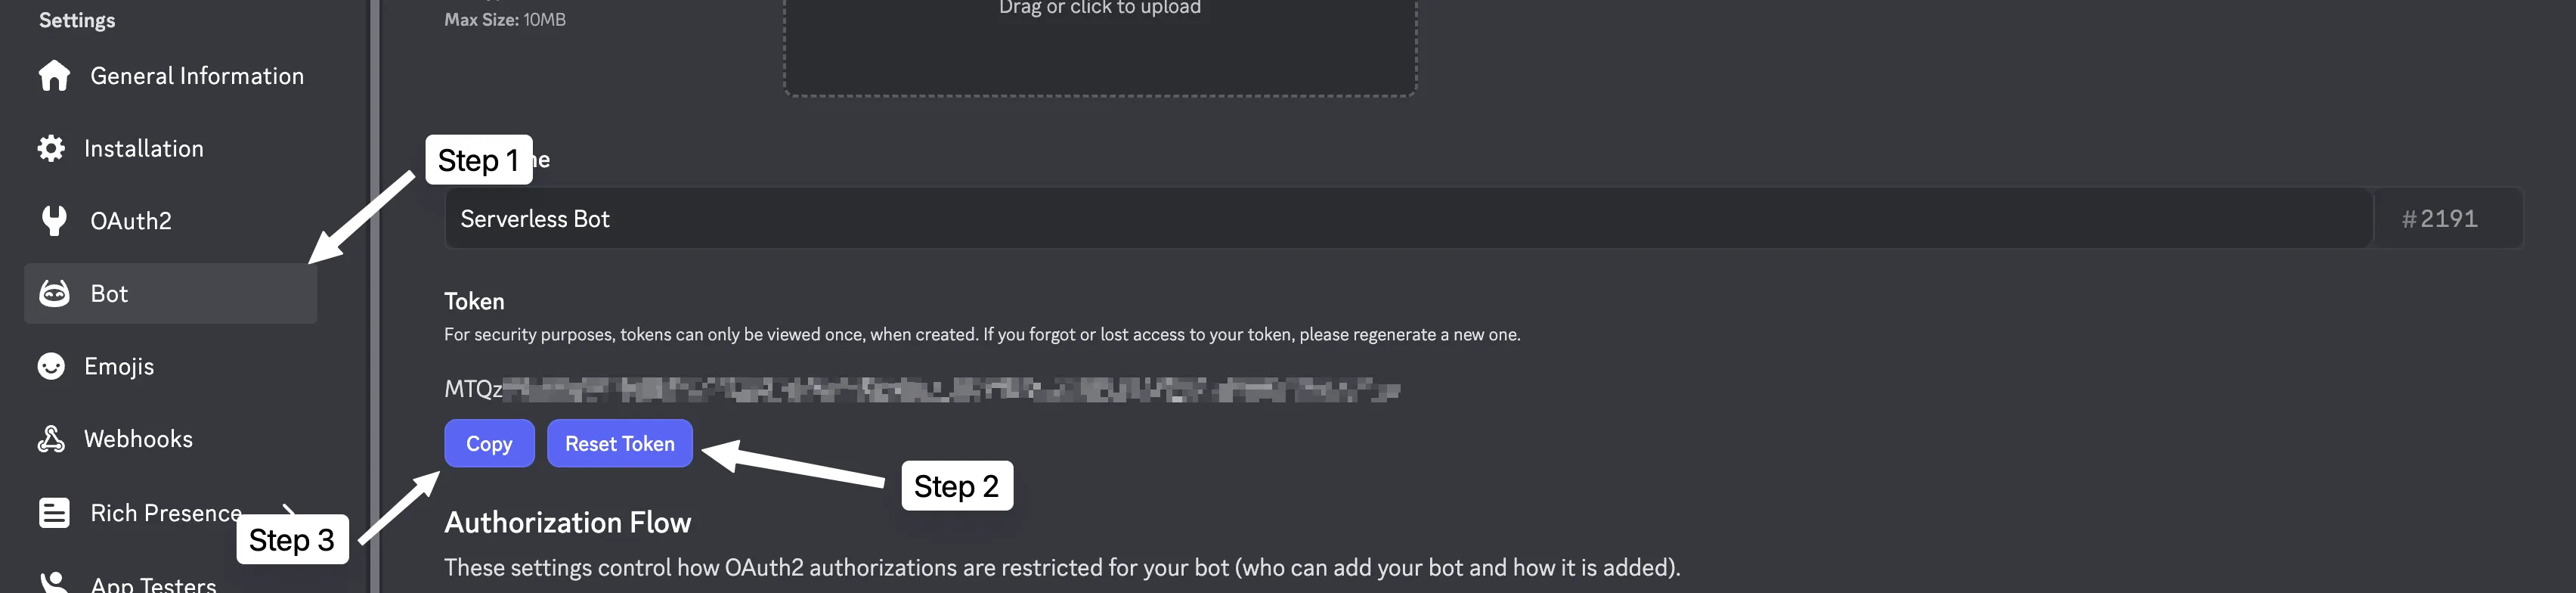
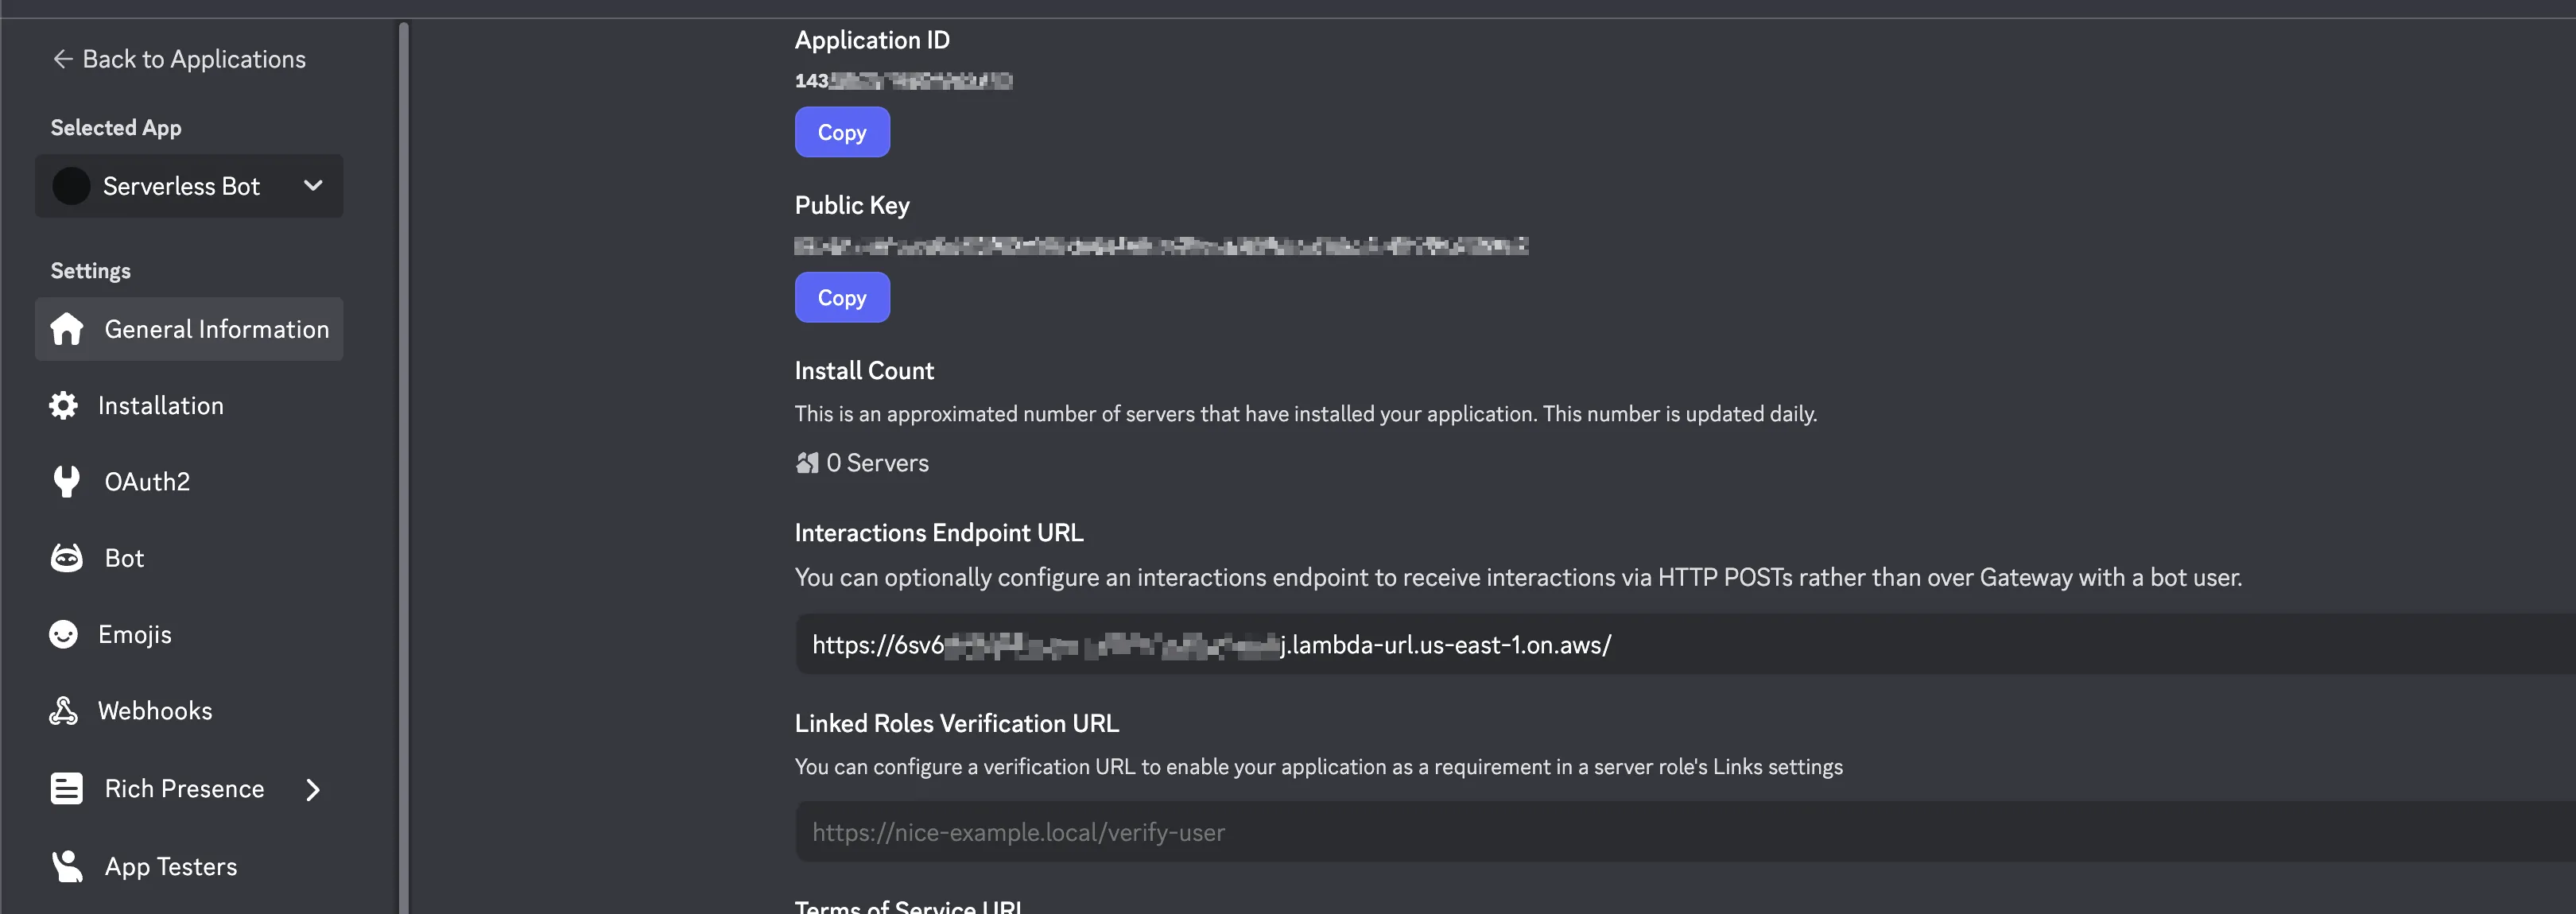
I took the bot token and setup an .env at the root of my project. You will need the bot token, public key, and app id for this file.
DISCORD_TOKEN="your-token-here"DISCORD_APP_ID="your-app-id-here"DISCORD_PUBLIC_KEY="your-public-key-here"Now that we have the bot token, public key, and app id we can start registering the command. Now that we have the bot token, public key, and app id we can register the command using the npm script we set up in Part 2.
npm run register⚠ Components directory not found⚠ Events directory not found… Bundling handlers
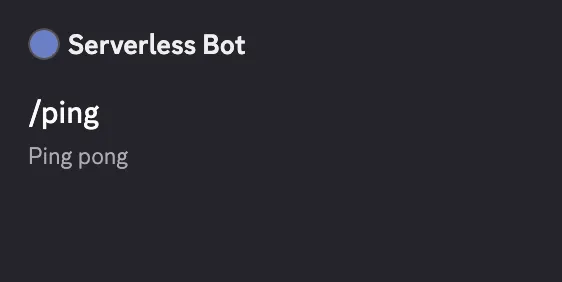
Command- ping
✔ Assembled generated build└ Registers commands… Registering commands✔ Registered commandsOnce that’s ran, you should see command pop up almost immediately for you. If it doesn’t you may need to refresh your client.
Implementing Discord Interactions (FINALLY)
Now it’s time to hook up the lambda with the Dressed output! For the sake of it let’s go ahead and rebuild WITHOUT registering the commands to ensure that we don’t accidentally install the commands each time we run the lambda, unlikely but just to be safe.
npx dressed build --root botLet’s hop back to the lambdas/interaction.ts and start getting hooking things up! Let’s understand how Dressed expects the input. The dressed/server exports a handleRequest function that will take our compiled command, components, config, and event outputs as arguments and process the request and handles all the logic for us. However, the default Lambda event isn’t in the Undici Request format that Dressed expects so we need to get a correct format to send to the handleRequest function.
export async function handler(event) {
const url = `https://${event.requestContext.domainName}${event.rawPath}${ event.rawQueryString ? `?${event.rawQueryString}` : "" }`;
const request = new Request(url, { method: event.requestContext.http.method, headers: event.headers, body: event.body || undefined, });
return { message: "hello readers!", };}Once we have that, we can pass it to the handleRequest function and it will handle the rest of the logic for us. We will also need to await the response to ensure it fully completes before shutting the lambda down.
import { handleRequest } from 'dressed/server'import { commands, components, config, events } from '../.dressed'
export async function handler(event) { const url = `https://${event.requestContext.domainName}${event.rawPath}${ event.rawQueryString ? `?${event.rawQueryString}` : "" }`;
const request = new Request(url, { method: event.requestContext.http.method, headers: event.headers, body: event.body || undefined, });
const response = await handleRequest(request, commands, components, events, config) const body = await response.text()
return { message: "Hello, world!" }; return { statusCode: response.status, body, headers: Object.fromEntries(response.headers.entries()), }}We will also need to set a couple of environment variables for our bot. This will be the token, public key, and application id from earlier. To do that we will have secrets in our SST app.
/// <reference path="./.sst/platform/config.d.ts" />
export default $config({ app(input) { return { name: "serverless-bot", removal: input?.stage === "production" ? "retain" : "remove", protect: ["production"].includes(input?.stage), home: "aws", }; }, async run() { const botToken = new sst.Secret("DiscordBotToken"); const appId = new sst.Secret("DiscordAppId"); const publicKey = new sst.Secret("DiscordPublicKey");
new sst.aws.Function("DiscordInteractionHandler", { handler: "lambdas/interaction.handler", url: true, environment: { DISCORD_TOKEN: botToken.value, DISCORD_APP_ID: appId.value, DISCORD_PUBLIC_KEY: publicKey.value, }, }); },});To set these secrets you need to run the following:
npx sst secret set DiscordBotToken your-bot-tokennpx sst secret set DiscordAppId your-app-idnpx sst secret set DiscordPublicKey your-public-keyBundle & Deploy
At this point it’s time to bundle and deploy our lambda function to AWS!
npm run deploy⚠ Components directory not found⚠ Events directory not found… Bundling handlers
Command- ping
✔ Assembled generated buildSST 3.17.21 ready!
➜ App: serverless-bot Stage: dev
~ Deploy
| Created DiscordPublicKey sst:sst:Secret (2.0s)| Created DiscordAppId sst:sst:Secret (2.0s)| Created DiscordBotToken sst:sst:Secret (2.2s)| Created DiscordInteractionHandler sst:aws:Function → DiscordInteractionHandlerSourcemap0 aws:s3:BucketObjectv2| Created DiscordInteractionHandler sst:aws:Function → DiscordInteractionHandlerCode aws:s3:BucketObjectv2| Updated DiscordInteractionHandler sst:aws:Function → DiscordInteractionHandlerFunction aws:lambda:Function (11.3s)| Deleted DiscordInteractionHandler sst:aws:Function → DiscordInteractionHandlerCode aws:s3:BucketObjectv2
↗ Permalink https://sst.dev/u/xxxxx
✓ Complete DiscordInteractionHandler: https://******.lambda-url.us-east-1.on.aws/Save the URL it gives you, you will need it!
Hooking up Discord with the Lambda
Head back over to your developer dashboard and click on the application you wanna hook up to the lambda. It should take you right into the general tab, at this point you’ll want to scroll down until you see “Interactions Endpoint URL”. Copy that URL from the earlier deploy and paste it into the field. At this point you should just be able to click save and it should work!
What happens in the background is that Discord will validate that your endpoint is able to receive interactions as well as ensure that when invalid ones are received it’s rejected accordingly. Discord will periodically check the endpoint to make sure it’s still working and still validates requests. If it fails, Discord will send you a message about it.
Now that it’s been saved, you should be able to run the /ping command and immediately see the response!

You’ve Done It!
Congratulations, you’ve officially deployed and built a serverless Discord bot and guess what? It doesn’t cost you a damn thing!
What’s Next?
Now that you’ve got a basic bot up and running, what’s next? As we mentioned in the beginning we want to implement a virtual currency system with a balance, daily, and gamble system. For this we will need a way to store the data and that’s where DynamoDB comes in.
If you’re interested in that, keep on reading to Expanding Functionality.